Let's get wired!
Almost but not quite. Had to replace the ethernet cable from the bridge (aka modem) to the network router/switch. An ethernet cable looks like a telephone cable but twice or so as big, Back to the cable. If you moved the cable the connection would fail. Not acceptable. Fortunately, had the tools and parts to repair the situation. Many places use wifi, but there are a lot of business establishments that do not allow wifi for security reasons. Since most tablets require the internet to be fully useful so that turns the units into bricks per se.
What do you do? You can now get adapters to connect touchpads to a hard wired old fashion network. Usually consists of a usb connection sometimes known as an On-The-Go or OTG cable and then attaching the ethernet adapter. Of course you still need that cable to connect to the network. Where do you get the cable? If you are at a business establishment, they probably have a spare. Looks better if you already have a cable with you though. Most better electronics stores now carry them. You have to be careful. I was at Walmart today and they had one for forty dollars. Eeeks. They had some others for between twelve and twenty dollars. A decent length of cable should be under ten dollars.
You have another alternative though and that is to make your own cable. If you take any amount of IT classes, you will be required to make a cable at least once. With a lot of companies converting from wired to wireless you can almost get old eight conductor cable for free. You will still need to get some of the RJ-45 plastic ends. Telephone wire uses RJ-11 ends. Generally there are different qualities of cable such as cat5, cat5a, and cat6. For a short cable on a traditional network, the qualities are not that critical yet. If your needing to make a lot of cable, it makes sense to buy cable in bulk.
Most networks are in what is known as the star configuration. There is also the bus, the token ring, and modified networks. We will skip those for now. That means everything connects into one set of points like the spokes of a wheel. When a cable is made the configuration of the wires is very important. You have two ways to connect the medium dependent interfaces (MDI for short). You can have the MDI straight though cable or you can use the MDI-X (MDI-crossover). This use to be very critcal what cable you used.

If you used a cable from a computer to a switch, the MDI cable usually worked just fine. Between routers usually used the crossover cable. Eventually those units had switches to allow the use of non-crossover cables. Today most routers now support auto-mdi so that it is not that critical as your the standard configuration. In most cases you will need just to have switches and standard cables to connect everything together. Now there is an exception. What if you want to hook two computers directly without a switch. You would then just use a crossover cable. Cool. So how does the cable go together. Most cables have the eight conductor inner wires color coded in a certain fashion.
.
Ethernet cabling comes in two versions usually comes in two versions, Tia/eia 568a and Tia/eia 568b. Tiaa/Eia 568b on both ends what is used for traditional MDI cable. If you want and MDI-X cable you would have one end as Tia/Eia 568a and the other end as Tia/Eia 568b. There are other configurations, but these are the most common. Sometimes the configuration is known as wo-o-wg-bl-wb-g-wbr-br and wg-g-wo-bl-wbl-o-wbr-br. So you have four pairs of twisted wires. See typical cables as shown below.
Let's make a cable.
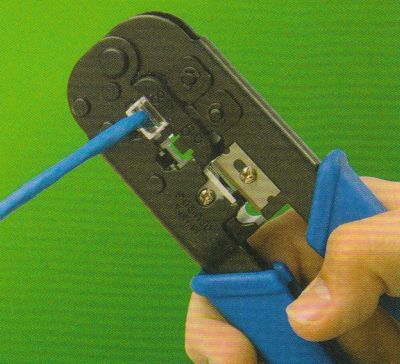
1. You will need an RJ-45 crimping tool. Some of then also support the RJ-11 for telephone lines. You can get them cheap, but it is better in the long run to get a better one.
2. You will also need at least two and better if you have more ends in case you make a mistake. Been there done that.
 3. Use the double edge cutters to gently cut the outside casing about and inch or so from the end of the cable without damaging the inner wires. This may take a little practice. If you make a mistake just cut off the bad part with the single blade on the tool.


4. Sometimes if is better not to get the whole sheating cut through to make sure the inner wires are not cut. Then just tear off the sheathing end, Notice the four twisted pair.

5. Now separate all the wires.

6. Then line up the wires. wo-o-wg-bl-wbl-g-wbr-br,

7. Uneven lengths trim them with the single edge blade.

8. With the clip side facing down gently insert the wires making sure they stay in line. Then press in the cable as far as you can. The outside cable should fit inside.

9. Recheck the cable color selection, if not correct, pull the wires out and reposition them. Then reinsert the cable. Also takes a bit of practice. Put the cable in the crimping tool and PRESS DOWN. Remove the cable from the crimper.

10. Repeat the prior steps for the other end.

11. Now you may want to test your cable. There are two kinds of testers, One tests the cable using both ends. Never use this tester with a wire connected to the network or it most likely will be destroyed, Read the manual how to speccifically use the one you have,

There are also testers designed to connect to a live network. But even then some can give false positives that the connection is good. Again read the manual on how to use it. Units made by Fluke have been the standard.

If all is well, use your cable. That is the real test. If for some reason you made an MDI cable and you need and MDI-X cable, you can get an adapter so that you do not have to redo the cable. Usually carry one with me on jobs.

That's it....
Note: you will eventually need a new end. They do not last forever. But you are ready to take care of that now!
Can not forget the female ends:

Update: Do not know why I forgot to add this, but you will want to use the cable with your handheld. most handhelds required a special cable to interface with a usb to ethernet adapter. For the Nexus 7 you need an OTG (on the go) cable. They are fairly inexpensive. The cable also allows you to add a powered usb adapter to add a keyboard and a host of other accessories.

What do you do? You can now get adapters to connect touchpads to a hard wired old fashion network. Usually consists of a usb connection sometimes known as an On-The-Go or OTG cable and then attaching the ethernet adapter. Of course you still need that cable to connect to the network. Where do you get the cable? If you are at a business establishment, they probably have a spare. Looks better if you already have a cable with you though. Most better electronics stores now carry them. You have to be careful. I was at Walmart today and they had one for forty dollars. Eeeks. They had some others for between twelve and twenty dollars. A decent length of cable should be under ten dollars.
You have another alternative though and that is to make your own cable. If you take any amount of IT classes, you will be required to make a cable at least once. With a lot of companies converting from wired to wireless you can almost get old eight conductor cable for free. You will still need to get some of the RJ-45 plastic ends. Telephone wire uses RJ-11 ends. Generally there are different qualities of cable such as cat5, cat5a, and cat6. For a short cable on a traditional network, the qualities are not that critical yet. If your needing to make a lot of cable, it makes sense to buy cable in bulk.
Most networks are in what is known as the star configuration. There is also the bus, the token ring, and modified networks. We will skip those for now. That means everything connects into one set of points like the spokes of a wheel. When a cable is made the configuration of the wires is very important. You have two ways to connect the medium dependent interfaces (MDI for short). You can have the MDI straight though cable or you can use the MDI-X (MDI-crossover). This use to be very critcal what cable you used.
If you used a cable from a computer to a switch, the MDI cable usually worked just fine. Between routers usually used the crossover cable. Eventually those units had switches to allow the use of non-crossover cables. Today most routers now support auto-mdi so that it is not that critical as your the standard configuration. In most cases you will need just to have switches and standard cables to connect everything together. Now there is an exception. What if you want to hook two computers directly without a switch. You would then just use a crossover cable. Cool. So how does the cable go together. Most cables have the eight conductor inner wires color coded in a certain fashion.
.
Ethernet cabling comes in two versions usually comes in two versions, Tia/eia 568a and Tia/eia 568b. Tiaa/Eia 568b on both ends what is used for traditional MDI cable. If you want and MDI-X cable you would have one end as Tia/Eia 568a and the other end as Tia/Eia 568b. There are other configurations, but these are the most common. Sometimes the configuration is known as wo-o-wg-bl-wb-g-wbr-br and wg-g-wo-bl-wbl-o-wbr-br. So you have four pairs of twisted wires. See typical cables as shown below.
Let's make a cable.
1. You will need an RJ-45 crimping tool. Some of then also support the RJ-11 for telephone lines. You can get them cheap, but it is better in the long run to get a better one.
2. You will also need at least two and better if you have more ends in case you make a mistake. Been there done that.
4. Sometimes if is better not to get the whole sheating cut through to make sure the inner wires are not cut. Then just tear off the sheathing end, Notice the four twisted pair.
5. Now separate all the wires.
6. Then line up the wires. wo-o-wg-bl-wbl-g-wbr-br,
7. Uneven lengths trim them with the single edge blade.
8. With the clip side facing down gently insert the wires making sure they stay in line. Then press in the cable as far as you can. The outside cable should fit inside.
9. Recheck the cable color selection, if not correct, pull the wires out and reposition them. Then reinsert the cable. Also takes a bit of practice. Put the cable in the crimping tool and PRESS DOWN. Remove the cable from the crimper.
10. Repeat the prior steps for the other end.
11. Now you may want to test your cable. There are two kinds of testers, One tests the cable using both ends. Never use this tester with a wire connected to the network or it most likely will be destroyed, Read the manual how to speccifically use the one you have,
There are also testers designed to connect to a live network. But even then some can give false positives that the connection is good. Again read the manual on how to use it. Units made by Fluke have been the standard.
If all is well, use your cable. That is the real test. If for some reason you made an MDI cable and you need and MDI-X cable, you can get an adapter so that you do not have to redo the cable. Usually carry one with me on jobs.
That's it....
Note: you will eventually need a new end. They do not last forever. But you are ready to take care of that now!
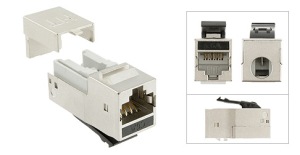
Can not forget the female ends:
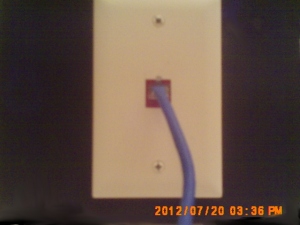
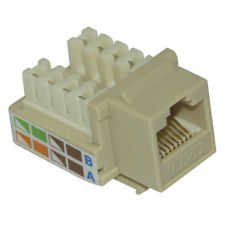
Followup to the cable making. You will also probably have to make a female end at one time or another. They are easier to prepare than the regular male ends. The female end will be inserted from inside the wall in a face plate

The connector is color coded with the standard wo-o-wg-bl-wbl-g-wbr-br. Not always in that order. Note the B and the A markings. Since the B type cable is used most often, the color chart is on the top.A so all you have to is is slide the proper color wire in the correct slot and then punch it down.

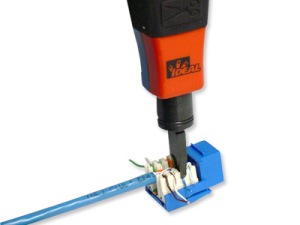
Example of a punch down tool being used. notice the extra length of wire. Pretty simple and easy. You will end up cutting off the extra wire.

Once you have punched down all eight wires, you will cover the unit with the provided caps.

We just use a cheap punch down tool that you can get probably 5-10 for 3 bucks. Good punch down tools go for thirty dollars or more depending on where you get the tool.

Update: Do not know why I forgot to add this, but you will want to use the cable with your handheld. most handhelds required a special cable to interface with a usb to ethernet adapter. For the Nexus 7 you need an OTG (on the go) cable. They are fairly inexpensive. The cable also allows you to add a powered usb adapter to add a keyboard and a host of other accessories.


Comments
Post a Comment