Posts

Showing posts with the label usb

Motioneyeos.

Image
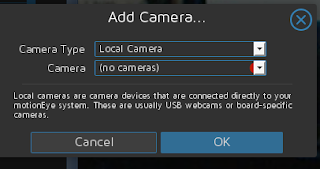
Normally I am not fond of canned software, but this one might be an exception. Motioneyeos is a raspberry pi implementation for the program Motion. Motion is software to control video capture devices. All control is done via the web. For purposes of this project we used an original raspberry pi. ( https://github.com/ccrisan/motioneyeos/releases ). There are several releases depending on the unit you have. First I tried a logitech usb camera clone. The system recognized it immediately. Not like a certain other operating system where you have to load the drivers for almost everything. Then we added an ipcamera (network ready). After adding the network camera file, it worked just like you would expect. The documentation for the camera did not have the description of the file. Fortunately the Motion software site did have that information.  ( http://www.lavrsen.dk/foswiki/bin/view/Motion/WorkingDevices ) Again no additional drivers were required. Actual picture is muc...

RPi gadget hint.

Suggested for the /etc/network/interfaces file Existing rpi configuration: allow - hotplug usb0 iface usb0 inet static address 192.168 . 7.2 netmask 255.255 . 255.0 network 192.168 . 7.0 broadcast 192.168 . 7.255 gateway 192.168 . 7.1 Recommended change: auto usb0 iface usb0 inet static address 192.168 . 7.2 netmask 255.255 . 255.0 network 192.168 . 7.0 broadcast 192.168 . 7.255 gateway 192.168 . 7.1 Existing host machine c onfiguration: allow - hotplug usb0 iface usb0 inet static address 192.168 . 7.2 netmask 255.255 . 255.0 network 192.168 . 7.0 broadcast 192.168 . 7.255 gateway 192.168 . 7.1   Recommended change:   auto usb0 iface usb0 inet static address 192.168 . 7.1 netmask 255.255 . 255.0 network 192.168 . 7.0 broadcast 192.168 . 7.255 gateway 192.168 . 7.1

Using your original xbox remote and sensor.

Image
Try this at your own risk. From the kodi wiki: Follow this simple procedure: Open the receiver's plastic case using a small screw driver. Carefully pry around the case. Solder the wire to the receiver using the picture below Note: This might damage the casing of the dongle. 1 Color Coded Pinout If you're using a standard USB cable you should just be able to match the colors and solder away, but to be sure check your cable with a continuity tester according to the USB spec provided here .  Red = Positive Power (+5V DC) White = Data - Green = Data + Yellow = Unused Black = Ground (0V DC)   Normal usb connections: Pin Name Cable color Description 1 VCC Red +5 VDC 2 D- White Data - 3 D+ Green Data + 4 GND Black Ground   2 Lirc Config /etc/lirc/hardware.conf : #Chosen Remote Control REMOTE="None" REMOTE_MODULES="lir...

From Hackaday: Single chip usb temperature sensor.

Image
Have not tested this, so try at your own risk. From Hackaday ( http://hackaday.io/project/6258 ) Single chip  usb temperature sensor. Description I  (the Hackaday author) created this project because I wanted to learn about PIC microcontrollers and the USB protocol. I also wanted to see how simple I could make a USB device. I've gotten it down to two components: a PIC16F1455 microcontroller and the USB connector. The microcontroller acts as a USB serial device and will send the temperature as an ASCII string once per second. Details The PIC16F1455 is a relatively new microcontroller that can do USB without an external crystal. It also has internal pull-up resistors for the USB data lines. These things mean no extra hardware is necessary for USB communication. I needed something useful to send over USB and I noticed that the PIC16F1455 has a...

Raid!

Image
Not mine, but interesting!!

How do you boot?

Image

Usb to isa.

Image
This company ( http://arstech.com/install/ecom-prodshow/usb2isar.html ) advertizes it has a usb to isa card interface. Just saw the ad. I do not endorse it, as I have never used or thoroughly tested one. But it looks interesting if you really have the need for one.

Usb to isa.

Image
This company ( http://arstech.com/install/ecom-prodshow/usb2isar.html ) advertizes it has a usb to isa card interface. Just saw the ad. I do not endorse it, as I have never used or thoroughly tested one. But it looks interesting if you really have the need for one.

Backup monitor?

Image
If you set up your serial port for communications and have a serial terminal (some systems may require a usb adapter), you will never worry about not having a monitor for emergencies. (Connecting in this case to an nslu2 running linux.)   Notes from an earlier article to set up serial communication, Your system may vary. Now to get the Pda working with the unit. The Palm pda will not work as is as a dumb terminal, so I had to install a program on to it from another computer called ptelnet.prc using a usb to serial interface. The Palm has an interface cable that will plug directly into the 9 pin serial port on the back of the computer. HP Journa has a standard rs232 port. $  pilot-xfer -p /dev/ttyUSB0 -i ptelnet.prc That should be easy. First to test the port. Strange the serial port on what is commonly known as com2:. (com1: =ttyS0) $ sudo /sbin/getty -h -L /dev/ttyS1 9600 vt100 & $ sudo chmod 666 /dev/ttyS1 A prompt did not show up on the Palm pda. ...

Charge it.

Image
Simple usb charger. try at your own risk, Minimal: Better:

More power.

Image
Just an idea I was thinking of for a power supply.

Getting the temperature.

Image
Decided to put some old heat sensors work with linux via Digitemp. The command names have changed a bit. From two of the more popular sites: (note: 25 pin connectors will use different connections.) http://hacknmod.com/tag/serial-port/ http://hackaday.com/tag/serial-port/ http://martybugs.net/electronics/tempsensor/ Temperature sensing with linux:  http://pihost.us/~stacato/digitemp/ You should be able to install digitemp from the repo without have to download the software and manually installing it. Debian based: $ sudo apt-get install digitemp Fedora based: $ sudo yum install digitemp ——————————————————- $ sudo apt-get digitemp Once inststalled You can use $ sudo digitemp_DS9097u -s /dev/ttyUSB0 -w “ Now, to read the temperatures. You’ll want the digitemp package, which is pre-packaged in Debian and probably most other Linux distributions. Once it’s installed, you’ll need to know what program to use. Several are available for different DS masters, but...

Emergency Usb condom.

Image
Emergency Usb condom. Connecting your phone or other computing device to an unknown usb port could get your device hacked. Protect yourself with a usb condomso data lines do not get connected to a nefarious host while charging. getting an usb extender bable from the dollar store is the easiest way to statr making one.

Emergency Usb condom.

Image
Emergency Usb condom. Connecting your phone or other computing device to an unknown usb port could get your device hacked. Protect yourself with a usb condomso data lines do not get connected to a nefarious host while charging. getting an usb extender bable from the dollar store is the easiest way to statr making one.

Nexux 7 and the Arduino.

Image
Want to hook your Nexus 7 directly to your arduino, then all you need is a OTG cable and a standard usb cable. Get the free (at this time) Usb(terminal app from the playtore and install it.You will want to set the arduino serial port and the Nexus 7 both the the same speed. We use 9600.  The android has an ide app for Android, but I have not tested it yet. Update Downmloaded and installed arduinodroid. Seems to work ok even with my osepp board.  Have fun. Code to send data from the Arduino to the Nexus 7. <code> void setup() {   // put your setup code here, to run once:  Serial.begin(9600); } void loop() {   // put your main code here, to run repeatedly:   Serial.println("This is a test");   delay(1000); } </code>

Experimental usb power adapter.

Image
Knowledge about electricity is required. Get an expert to help if you are the least bit unsure. We are not responcible for any and all issues. Great way to power your usb hubs if your pc can not handle it. Some hubs will not work with this setup, so try at your own risk.  Lot of people do this with the usb hubs, but I wanted to be able to use the hub without having to have the power attached.

Disaster survival sort of.

Image
Just a couple of instructables, that could help in a disaster situation. Coffee maker pasta: http://www.instructables.com/id/Coffee-maker-pasta/ Use a computer without a hard drive: http://www.instructables.com/id/Using-a-computer-without-a-hard-drive/ Computer network without a hard drive: http://www.instructables.com/id/No-hard-drive-network/ More later...

Computing hints.

Image
Just a few ideas I have come up with. http://www.instructables.com/id/Computing-hints-or-ideas/ Guess which of the two parts an esteemed ITT graduate said was the ram (random access memory). He did not get the job.

Openwrt for x86 - part 2

This section requires knowledge of bash. Please get a professional to help if you are unsure. The root partition of the official x86 OpenWrt image is not very big, about 50 MiB.  Many find it too small after installing a few add-on packages.  Here I will cover the steps to expand it.  The resultant image can be used in a live USB (see Easy Live USB for x86 OpenWRT ) or copied to a hard disk. Procedure Outline Get an uncompressed disk image. Pad image to desired size Attach the image file to a loop device Edit image partition table to enlarge the root partition Resize the file system in root partition Detach the image from the loop device. All commands below are run in Bash. Uncompress Image File Use whichever method you like to download an image file from OpenWrt ( http://downloads.openwrt.org ) and uncompress it using gzip.  For example, these two commands download and uncompress the 10.03.1-rc6 disk image. bash$ wget --quiet http:/...