Posts

Showing posts with the label port

Stepper motor and the parallel port.

Image
Various stepper motors, They are great for robots and other automation projects.  The same ideas can be used with micro-controllers.Here are just a few notes. Testing stepper motor wiring: http://www.piclist.com/techref/io/stepper/wiresmeterbattery.htm The bipolar motor (4 wire): From an old Seagate hard drive. Unipolar motor. CLS VarMode = 0 VarRot = 0 VarRev = 0 VarDelay = 0 int1 = 0 Main: CLS OUT 888, 0 DO UNTIL INKEY$ <> "" PRINT "Enter the number of revolutions" INPUT VarRev VarRev = VarRev * 50 PRINT "Enter the Mode of operation" PRINT " 1 for single coil excitation" PRINT " 2 for double coil excitation" INPUT VarMode PRINT "Enter the number of delay cycles" INPUT VarDelay PRINT "Enter the direction of rotation" PRINT "5 for CW 7 for CCW" INPUT VarRot VarMode = VarRot + VarMode IF VarMode = 6 THEN GOTO ScCW: IF VarMode = 7 ...

Control a program from a web page.

Image
 To the page where the web options are. Now you need to choose and option. [code]   <html> <title> Offshore Educators (Main Page) </title>  <title> lights </title>  <body bgcolor="aquamarine">     <CENTER><h2><B><I>Test PPort</I></B></h2></CENTER> Press a button to perform an action     <form ACTION="kitt.php" method="post">     <p>     <input type="submit" value="Kitt">     </form>     <p>     <form ACTION="rnd.php" method="post">     <p>     <input type="submit" value="Random">     </form>     <form ACTION="allon.php" method="post">     <p>     <input type="submit" value="All led's on">...

Arduino and the legacy printer port.

Image
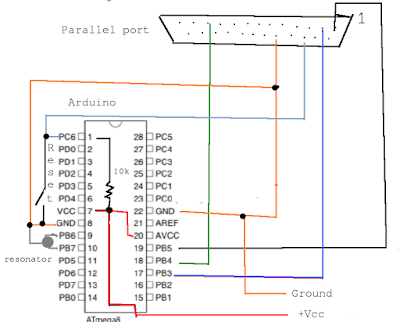
Try at your own risk!!!! It could brick your arduino!! 1. Minimal Arduino I recently got really interested in Arduino hardware. For those who don't know what it is,   Arduino is an open-source electronics prototyping platform based on flexible, easy-to-use hardware and software. It's intended for artists, designers, hobbyists, and anyone interested in creating interactive objects or environments. http://arduino.cc/    So I looked for ways to make my own board but as I am not into electronics, I needed something really simple, where I just needed to put in components, abracadabra and it should start working. So after much research (Googling actually) I have now learned how to make a minimal Arduino clone. PARTS LIST ATmega168 (or similar e.g. ATmega8) (Rs. 300) A Breadboard (Rs. 150) 7805 Voltage regulator (Rs.10) 2 LEDs (Rs. 5) 2 10 uF capacitors (Rs.5) 16 MHz clock crystal 2 22 pF capacitors 2 220 Ohm resistors 1 10k Ohm resistor small mome...

Pwm

Image
From Wikipedia: Pulse-width modulation ( PWM ), or pulse-duration modulation ( PDM ), is a technique used to encode a message into a pulsing signal . It is a type of modulation . Although this modulation technique can be used to encode information for transmission, its main use is to allow the control of the power supplied to electrical devices, especially to inertial loads such as motors. In addition, PWM is one of the two principal algorithms used in photovoltaic solar battery chargers, [1] the other being MPPT . The average value of voltage (and current ) fed to the load is controlled by turning the switch between supply and load on and off at a fast rate. The longer the switch is on compared to the off periods, the higher the total power supplied to the load. The PWM switching frequency has to be much higher than what would affect the load (the device that uses the power), which is to say that the resultant waveform perceived by the load must be as smooth as ...

ir monitor via parallel port.

Image
The figure shows a schematic of the IR receiver circuit. The heart of the circuit is MOD1, an infrared detector module that removes the IR carrier frequency and transmits only the data that are encoded in the received IR signal. A suitable IR module is available at Radio Shack (No. 276-137 which is no longer sold). Might try Model: 276-640, but check the specs for sure. You probably could pull one from an old vcr.  The IR module needs a clean 5-V power supply, which is provided by IC1, a 7805 regulator. Power is supplied to the regulator by 9-V battery B1. The output of the module is wired to a male DB-25 multipin connector. The infrared detector module receives a signal, filters it, and removes the 40-kHz carrier. The output of the module is a TTL-level signal consisting of long and short pulses. The PC records those voltage levels over time, while the signal is being sent, and stores the data in a file. The line normally used by the PC's printer port to ind...

Freebasic on the Raspberry Pi.

Image
So happy that I can run even if it is an old version of Freebasic on the Raspberry Pi. Freebasic  is a lot like but not exactly like qbasic. The first thing I did was to port a spreadsheet to the unit. To set up Freebasic, the first thing I did was to download the tarball and the extract it. (from sourceforge.net ) $ tar xvf fbc-0.91.0-pi-debian.tar.gz Install it. $ sudo ./install.sh -i And lastly install a few goodies to make the install complete.  $ sudo apt-get install libxext-dev libncurses5-dev libx11-dev libxpm-dev libxrandr-dev libstdc++6-4.4-dev You should be able to write a test program to see if the install worked. In an editor, type a simple program. $ vim test,bas PRINT "hello!" Compile it $ fbc test.bas Run it. $ ./test hello! There is more to it than that but that is a quickie starter.

Turn on an led in a low voltage circuit

Image
It's almost the holiday season and you might want to get geekie. If you are unsure about this, get profession help for the project. Try this at your own risk. We take no responsibilities for anything you may or may not do. This article is not a how to, but it is informational. What we want to do is to control lighting so that we can turn it off or on with electronic equipment instead of doing it manually with a traditional light switch. In this case, we may want to control holiday lights Such as an Xmas tree. We could use the light switch like above, or we can use a computer or a micro-controller. In this case we will suggest three posiblilities. The computer using a traditional parallel port, A raspberry Pi, or an Arduino. The simplest way to do this is with a solid state relay. Basically it is just like turning on an led. If you turn on the data line so it goes to near 5 volts, the led will turn on  or the SSR will allow the output side to work. An SSR let y...

Parallel port inclinations.

Image
Shame that computer makers have pretty much eliminated the parallel port. You can use the usb parallel cables or if you can find them pci cards are available on a declining basis. The usb parallel cables are not completely compatible with the traditional parallel port.  This a shame because so many options are available for the parallel port. Everything from the old Covox fake sound card interface, digital interfacing including I2C, and even doing CNC machining.  So many options taken away from users. Using the parallel port is as easy as making a cable. The centronics parallel interface has the available thirty-six pins. Coming off the computer the computer has only twenty-five pins. If you really look at the parallel port only eighteen pins are only what is used. With two ten pin terminal bars, you can access the eighteen usefull pins from the parallel port. You can control stepper motors, led lights, and a host of other pieces of equipment. One of the reasons like to...

Looks may be decieving

Image
Wanted a simple business program that I could run on a minimal or embedded machine that emulated the old Fish Market dbase example from years ago. Probably could of used Harbour software, but was not happy with it. Dbase is no longer around, so I can not run it on Linux.  Could always use an sql program to control the database. Decided to use bash as the front end, Next was to see how hard it would be to emulate the the screens generated in Dbase. Commented in an earlier article that it is good to know several languages. Here even knowing just a minimal amount about the dbase language allowed there to be a port of the code. Two examples of the code where one was done with dbase and the other was done in bash. Fortunately I was able to convert the main menu for starters. Here are the two screen shots accomplishing the same goal of a main menu: Actually it was not that hard to port the code from dbase to bash so far. In fact the code for both looks a lot the same. Dbase...

Parallel port floppy control.

Image
Though floppy drives are not really used anymore, they can be adapted for other purposes. Most web cameras only look in one direction. With the help of a floppy drive and a sort of lazy Susan, you can control the direction of view for the webcam. The electronic wiring is fairly  simple. You can connect in several ways.  Variation: if the jumper from pin 11 to 12 is set and you have the power source connected, the led of the disk drive should be on. If you do not want to use the picture: A. Connect Pin 11 and 12 with a Jumper on the drive. B. Connect Pin 18 of the drive with Pin 2 of the parallel port. C. Connect Pin 20 of the drive with Pin 3 of the parallel port. D. Connect the rightest pin of the power from the drive to the red wire of the floppy power cable. E. Connect the pin left of the rightest pin of the power with black wire on the floppy power connector and to the ground to pin 18 of the parallel port. Actually I did not touch the ground wir...