Posts

Showing posts with the label Raspberry

Motioneyeos.

Image
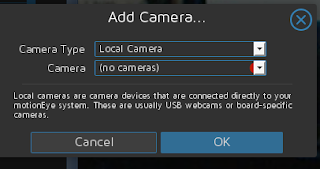
Normally I am not fond of canned software, but this one might be an exception. Motioneyeos is a raspberry pi implementation for the program Motion. Motion is software to control video capture devices. All control is done via the web. For purposes of this project we used an original raspberry pi. ( https://github.com/ccrisan/motioneyeos/releases ). There are several releases depending on the unit you have. First I tried a logitech usb camera clone. The system recognized it immediately. Not like a certain other operating system where you have to load the drivers for almost everything. Then we added an ipcamera (network ready). After adding the network camera file, it worked just like you would expect. The documentation for the camera did not have the description of the file. Fortunately the Motion software site did have that information.  ( http://www.lavrsen.dk/foswiki/bin/view/Motion/WorkingDevices ) Again no additional drivers were required. Actual picture is muc...

Legacy computer home automation server

Image
Using legacy systems to do home automation when an Arduino or Raspberry Pi may not be available. They can work just as well.  Server is a Pentium III with Ubuntu and Apache2. Enabled CGI (common gateway interface). Wrote all my own scripts using html, bash, and compiled freebasic (controls the leds).    Leds are connected to the parallel port via a home made adapter cable. Most of the code and interfaces are described in previous articles.  Added the video to the home web page: Time to control real world object such as a coffeemaker. For more information: http://www.tldp.org/HOWTO/text/Coffee

Five volt adapter.

Image
If you have a bunch of old +5v powerblocks with barrel connectors, then you may think they are worthless. Not so you can now get adapters to keep using the old powerblocks with your Raspberry Pi. With the adapter, you can still use the power block as you always have and no soldering required. You could also adapt an old computer power supply. Dangerous!! Wrongly set up it could KILL you Do not do this without expert help. Every power supply is different so you will have to tget the pinout for your power supply to be used. Do not do anything while the splly is plugged in on or off!!!!  Suggestions: User your favorite search engine. AT: ATX: Polarity matters:

PiFM sorta

Image
Wanted to be able to send music to speakers outside the house say for a barbecue or whatever. Could use Blue tooth among other things, but I wanted something more secure and easier to generally implement. PiFM seemed to be an answer . With a RPi you can send an old fashion radio signal to a radio and the radio will play what is sent it. All you need is an up to date Raspian install on a Raspberry Pi with internet access. I used the original  Raspberry pi for this project. I will probably set one up with the RPi zero. (Note: check you local laws to see if this is allowed.) Also you need to have experience using you RPi remotely. Antenna needs to be at least 7-14 inches long. You need to log into your Rpi command line. All this can be done easily. First thing is to get some software from the software repo for doing software development. Don't worry it will not hurt too bad. Update the system: $ sudo apt-get update $ sudo apt-get upgrade -y $ sudo apt-get dist-update -y...

RPi gadget hint.

Suggested for the /etc/network/interfaces file Existing rpi configuration: allow - hotplug usb0 iface usb0 inet static address 192.168 . 7.2 netmask 255.255 . 255.0 network 192.168 . 7.0 broadcast 192.168 . 7.255 gateway 192.168 . 7.1 Recommended change: auto usb0 iface usb0 inet static address 192.168 . 7.2 netmask 255.255 . 255.0 network 192.168 . 7.0 broadcast 192.168 . 7.255 gateway 192.168 . 7.1 Existing host machine c onfiguration: allow - hotplug usb0 iface usb0 inet static address 192.168 . 7.2 netmask 255.255 . 255.0 network 192.168 . 7.0 broadcast 192.168 . 7.255 gateway 192.168 . 7.1   Recommended change:   auto usb0 iface usb0 inet static address 192.168 . 7.1 netmask 255.255 . 255.0 network 192.168 . 7.0 broadcast 192.168 . 7.255 gateway 192.168 . 7.1

Raspberry pi zero

Image
Bought some of the Raspberry Pi Zeros for five dollars.  Was able to install the standard Raspian image on an mm card and boot up without problem. On the system I used I remotely logged into the Rpi via ssh so that I did not need a monitor. Changed the user password and shut down. For the image you will need to to use a micro sd card for the image. The raspberry website has all the details how to do that.  Used a regular sd card with a micro insert so that the usb to mmccard adapter would easily handle the image to the card. There are two micro usb ports on the board so that one is for power and the other is for a regular usb connection. They are marked on the board. On the regular usb port, I hooked up an otg cable connected to a usb ethernet adapter. Raspian saw the ethernet adapter without any problem. As for audio, you have to use the hdmi adapter, though to connect to a regular hdmi cable you will need a mini to standard adapter. So you might as well get  h...

Touchpad plus.

Image
RPi. Touch pads good or bad are becoming so inexpensive that for the buck they are a better value than the lcd (liquid crystal displays) screens.  Also lcd's require interfacing. Just wanted something simple and elegant. So when thinking about making a portable device such as the Raspberry Pi, the touch pads had to be considered. Of course, other ways were considered also. For example you could use an an old black and white portable tv screen. Though portable and having it's own power source to power itself and the Raspberry Pi, they can be a bit bulky. Then another choice was a bit less bulky and you had the advantage of having a dual purpose media device as a monitor. Yes a cd/dvd play could be considered if it has a least video in and a usb port for powering the Raspberry Pi.  As with the tv you will need to make a special case, but that is no big deal.  The best choice it seemed to me would be to use a touch pad. But how to connect them b...

A little Raspberry Pi for later.

Image

RPi 1 cased

Image
There are a lot of diy cases on the net. Probably the most notable one is the cardboard case.  You can easily find them on the net by looking for RPi printable cases. Be sure and tell the printing program not to resize image for printing. This next two were not real impressive and not so easily put together. Kind of flimsy? This next one seemed a bit complicated. Then there are the .dxf files with Librecad so you can use them a laser cutter or cnc router.

Arch linux on the rpi

Image
Set up an sd card with arch linux. You should be logged in as root. Decided to make a sd card with arch linux using these instructions: SD Card Creation Replace sdX in the following instructions with the device name for the SD card as it appears on your computer. Start fdisk to partition the SD card: fdisk /dev/sdX At the fdisk prompt, delete old partitions and create a new one: Type o . This will clear out any partitions on the drive. Type p to list partitions. There should be no partitions left. Type n , then p for primary, 1 for the first partition on the drive, press ENTER to accept the default first sector, then type +100M for the last sector. Type t , then c to set the first partition to type W95 FAT32 (LBA). Type n , then p for primary, 2 for the second partition on the drive, and then press ENTER twice to accept the default first and last sector. Write the partition table and exit by typing w . Create and mount the FAT filesystem: mkfs...

Remote to the RPi.

Image
It is challenging to have to provide a keyboard and a mouse to multiple machines, so why not remote into them. The Raspberry pi is an exemplary system for using remotely.To set this up you will want to remotely log into the RPi to set up xrdp.  ssh pi@192.168.1.116 pi@oerpi02 ~ $ sudo apt-get install xrdp That is all for the RPi side, so all you have to do is log in remotely. Fire up you remote desktop viewer. Enter in the appropriate settings. Type in login and password. And viola you have a remote connection, Some people have found this post also useful: http://computoman.blogspot.com/2011/11/red-october-network-discovery.html