Wifi and the Arduino.
Good for arduino to arduino.
Have some of the nrf24l0 wifi units to play with. will test them with the Arduino first. One person suggest that a 100 nf capacitor be placed between plus five and ground for more power stability.
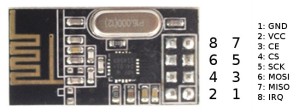
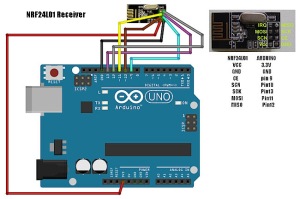
More information at: http://playground.arduino.cc/InterfacingWithHardware/Nrf24L01
Experimental code:
https://github.com/tmrh20/RF24
Note had to set up and SPI directory and copy the files over to the Arduino folder.
The you had to tell the arduino about the library
----------------------------------------------------------------------------------------------
Compatible to computer networks.
What is the ESP8266?
The ESP8266, is a cheap WiFi module which you can address using the UART protocol. It’s been featured on Hackaday and other DIY electronics blogs very recently, and lots of DIY electronics tinkers are very excited at the doors this module opens for their projects. The module is:
Small Footprint
Easy to integrate with (using UART)
Takes care of all other overheads for getting WiFi up-and-running (TCP/IP Stack etc…)
. . . and, perhaps more importantly than all the other factors, very cheap – it can be purchased from China in a quantity of one for less than £4 !
There are no market equivalents for the DIY community – the XBee has been a popular choice for adding WiFi to DIY projects up until now, but the ESP8266 module is close to one tenth the price making it easily accessible for all types of low cost applications.
The ESP8266 is the name of the chip it’s self manufactured by a company called Espressif, but it is sold in modules manufactured in China which look as seen below,

The module can be addressed using a series of AT commands. These are simple commands sent UART at 115200 baud. For example, once the module is wired up, you can send the command
AT+RST will perform a software reset on the device. AT+CWLAP will display all of the currently available WiFi networks etc. – simple enough!
How do I set up the ESP8266 Module?


Here is a simple pin-out for the module (the pin numbers are defined in the table
and relate to the image):
Note: Under normal operation Pin 6 (CH_PD) should be tied high (3V3) to ensure correct operation
As such, you can easily wire up the module to an Arduino or just a simple USB to serial converter and start sending AT commands (Remember: RX on the module joins to TX on the connection device and vice versa!).
What are the drawbacks of using this module?
As we’ve seen above, this is shaping up to be a very good value-for-money solution for adding WiFi capabilities to DIY projects, so what are the limitations.
The module is rather ‘power thirsty’. The current supplied via USB to an Arduino is barely enough to power this module. Other websites have recommended that you should have easily 1A available, but I have not measured this myself. This makes integrating the module slightly more tricky as a second, separate voltage regulator is required and it also rules out any battery powered projects.
It is temperamental – I’ve had a chance to play with this module, and although it works most of the time, all of the sample code I have found provides far from a solid solution – there are plenty of quirks to using it.
Code examples: https://github.com/esp8266/Arduino/archive/esp8266-sdk-1.0.zip
Adding support for the esp8266 in the arduino ide 1.6.4 Depending on the speed of your internet connection how long it will take


More info later...
Have some of the nrf24l0 wifi units to play with. will test them with the Arduino first. One person suggest that a 100 nf capacitor be placed between plus five and ground for more power stability.

More information at: http://playground.arduino.cc/InterfacingWithHardware/Nrf24L01
Experimental code:
https://github.com/tmrh20/RF24
Note had to set up and SPI directory and copy the files over to the Arduino folder.
The you had to tell the arduino about the library
----------------------------------------------------------------------------------------------
Compatible to computer networks.
What is the ESP8266?
The ESP8266, is a cheap WiFi module which you can address using the UART protocol. It’s been featured on Hackaday and other DIY electronics blogs very recently, and lots of DIY electronics tinkers are very excited at the doors this module opens for their projects. The module is:
Small Footprint
Easy to integrate with (using UART)
Takes care of all other overheads for getting WiFi up-and-running (TCP/IP Stack etc…)
. . . and, perhaps more importantly than all the other factors, very cheap – it can be purchased from China in a quantity of one for less than £4 !
There are no market equivalents for the DIY community – the XBee has been a popular choice for adding WiFi to DIY projects up until now, but the ESP8266 module is close to one tenth the price making it easily accessible for all types of low cost applications.
The ESP8266 is the name of the chip it’s self manufactured by a company called Espressif, but it is sold in modules manufactured in China which look as seen below,
The module can be addressed using a series of AT commands. These are simple commands sent UART at 115200 baud. For example, once the module is wired up, you can send the command
AT+RST will perform a software reset on the device. AT+CWLAP will display all of the currently available WiFi networks etc. – simple enough!
How do I set up the ESP8266 Module?


Here is a simple pin-out for the module (the pin numbers are defined in the table
and relate to the image):
| Pin Number | Pin Function | Pin Number | Pin Function |
| 1 | RX | 5 | GPIO2 |
| 2 | VCC | 6 | CH_PD |
| 3 | GPIO0 | 7 | GND |
| 4 | RST | 8 | TX |
Note: Under normal operation Pin 6 (CH_PD) should be tied high (3V3) to ensure correct operation
As such, you can easily wire up the module to an Arduino or just a simple USB to serial converter and start sending AT commands (Remember: RX on the module joins to TX on the connection device and vice versa!).
What are the drawbacks of using this module?
As we’ve seen above, this is shaping up to be a very good value-for-money solution for adding WiFi capabilities to DIY projects, so what are the limitations.
The module is rather ‘power thirsty’. The current supplied via USB to an Arduino is barely enough to power this module. Other websites have recommended that you should have easily 1A available, but I have not measured this myself. This makes integrating the module slightly more tricky as a second, separate voltage regulator is required and it also rules out any battery powered projects.
It is temperamental – I’ve had a chance to play with this module, and although it works most of the time, all of the sample code I have found provides far from a solid solution – there are plenty of quirks to using it.
Code examples: https://github.com/esp8266/Arduino/archive/esp8266-sdk-1.0.zip
Adding support for the esp8266 in the arduino ide 1.6.4 Depending on the speed of your internet connection how long it will take
Installing with Boards Manager
Starting with 1.6.4, Arduino allows installation of third-party platform packages using Boards Manager. We have packages available for Windows, Mac OS, and Linux (32 and 64 bit). The 1.7.3 version did not have this option.- Install Arduino 1.6.4 from the Arduino website.
- Start Arduino and open Perferences window.
- Enter
http://arduino.esp8266.com/package_esp8266com_index.jsoninto Additional Board Manager URLs field. You can add multiple URLs, separating them with commas. - Open Boards Manager from Tools > Board menu and install esp8266 platform (and don't forget to select your ESP8266 board from Tools > Board menu after installation).


More info later...


Wifi And The Arduino. >>>>> Download Now
ReplyDelete>>>>> Download Full
Wifi And The Arduino. >>>>> Download LINK
>>>>> Download Now
Wifi And The Arduino. >>>>> Download Full
>>>>> Download LINK uw