Arduino and the legacy printer port.
Try at your own risk!!!! It could brick your arduino!!
1. Minimal Arduino
I recently got really interested in Arduino hardware. For those who don't know what it is,
Arduino is an open-source electronics prototyping platform based on
flexible, easy-to-use hardware and software. It's intended for artists,
designers, hobbyists, and anyone interested in creating interactive
objects or environments.
So I looked for ways to make
my own board but as I am not into electronics, I needed something really
simple, where I just needed to put in components, abracadabra and it
should start working. So after much research (Googling actually) I have now learned how to make a minimal Arduino clone.
PARTS LIST
Note: replaced a resonator for the capacitors and the crystal.
PARTS LIST
ATmega168 (or similar e.g. ATmega8) (Rs. 300)
A Breadboard (Rs. 150)
7805 Voltage regulator (Rs.10)
2 LEDs (Rs. 5)
2 10 uF capacitors (Rs.5)
16 MHz clock crystal
2 22 pF capacitors
2 220 Ohm resistors
1 10k Ohm resistor
small momentary normally open ("off") button, i.e. Omron type B3F
A Breadboard (Rs. 150)
7805 Voltage regulator (Rs.10)
2 LEDs (Rs. 5)
2 10 uF capacitors (Rs.5)
16 MHz clock crystal
2 22 pF capacitors
2 220 Ohm resistors
1 10k Ohm resistor
small momentary normally open ("off") button, i.e. Omron type B3F
Note: replaced a resonator for the capacitors and the crystal.
BUILD IT
Before building the main circuit, you need to prepare a 5v supply.
Use 7805 voltage regulator, have a look at this picture:
You need to provide 9v-12v to the INPUT and connect ground wire to GROUND. Then use OUTPUT pin for 5v output and do not forget to ground your circuit with the same GROUND pin.
Next step is to add an LED. An LED attached to power like this is a great troubleshooting trick. You'll always know when your board is being powered as well as quickly know if your board is being shorted.
We will be using Atmega168(or similar) for our Arduino:

ATmega168
Before moving on, this image is a great resource for learning what each of the pins on your Atmega chip do in relation to the Arduino's functions. This will clarify a lot of confusion behind why we hook up certain pins the way we do.
Start by adding a 10k ohm resistor "up" (to power) on the RESET pin in order to prevent the chip from resetting itself during normal operation. The RESET pin reboots the chip when pulled down to ground. In later steps I will show you how to add a reset switch that takes advantage of this.
This is where we add the small tactile switch so that we can reset the Arduino whenever we'd like and prepare the chip for uploading a new program. A quick momentary press of this switch will reset the chip when needed. Add the switch just above the top of the Atmega chip. Connect one leg to the RESET on the chip. Then, connect the other leg of the button to the ground.
small tactile switch
Success!
Congratulations, You just made an Arduino clone for yourself.
As of now, this arduino is of no use to you. As it is not functional.
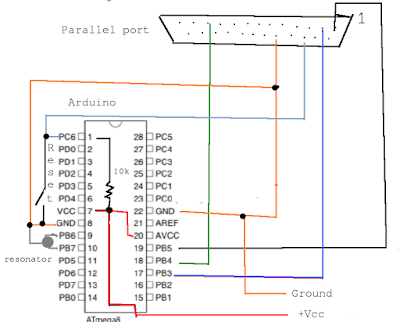
We need a Programmer to "program" our Atmega chip.
I opted for Parallel Programmer, which is the cheapest and simplest one.
You need a male DB25 parallel port connector and some wires.
Before building the main circuit, you need to prepare a 5v supply.
Use 7805 voltage regulator, have a look at this picture:
You need to provide 9v-12v to the INPUT and connect ground wire to GROUND. Then use OUTPUT pin for 5v output and do not forget to ground your circuit with the same GROUND pin.
Next step is to add an LED. An LED attached to power like this is a great troubleshooting trick. You'll always know when your board is being powered as well as quickly know if your board is being shorted.
We will be using Atmega168(or similar) for our Arduino:

ATmega168
Before moving on, this image is a great resource for learning what each of the pins on your Atmega chip do in relation to the Arduino's functions. This will clarify a lot of confusion behind why we hook up certain pins the way we do.
Start by adding a 10k ohm resistor "up" (to power) on the RESET pin in order to prevent the chip from resetting itself during normal operation. The RESET pin reboots the chip when pulled down to ground. In later steps I will show you how to add a reset switch that takes advantage of this.
- Pin 7 - Vcc - Digital Supply Voltage
- Pin 8 - GND
- Pin 22 - GND
- Pin 20 - AVcc - Suppply voltage for the ADC converter. Needs to be connected to power if ADC isn't being used and to power via a low-pass filter if it is (a low pass filter is a circuit that cleans out noise from the power source, we aren't using one)
This is where we add the small tactile switch so that we can reset the Arduino whenever we'd like and prepare the chip for uploading a new program. A quick momentary press of this switch will reset the chip when needed. Add the switch just above the top of the Atmega chip. Connect one leg to the RESET on the chip. Then, connect the other leg of the button to the ground.
small tactile switch
Success!
Congratulations, You just made an Arduino clone for yourself.
As of now, this arduino is of no use to you. As it is not functional.
We need a Programmer to "program" our Atmega chip.
I opted for Parallel Programmer, which is the cheapest and simplest one.
You need a male DB25 parallel port connector and some wires.

DB25 male connector
Now you need to solder some pins of this connector to your chip.
| Pin of DB25 | Pin of ATmega168 |
| Pin 11 | Pin 18 |
| Pin 1 | Pin 19 |
| Pin 16 | Pin 1 |
| Pin 2 | Pin 17 |
| Pin 18 | GROUND |
Please be sure to keep the wire between the parallel port and Atmega chip short as possible.
Now we are done with the hardware part.
Connect you Arduino to your PC through Parallel Programmer and execute these commands through avrdude (Download)
Unzip avrdude into a folder and use CMD(MS-DOS) to first navigate to that new folder you just unzipped and execute the following:
avrdude.exe -p m168 -v -U hfuse:w:0xdf:m -U lfuse:w:0xc7:m -U efuse:w:0x08:m
This command will set the Fuse settings of your chip to use the external 16Mhz crystal we connected earlier (by default, the chip will use 1Mhz internal clock which is slow)
Getting started with programming with Arduino:
Download Arduino software from www.arduino.cc
Before you start programming with Arduino software, configure it to use Parallel Programmer.
- Go to C:\Documents and Settings\YOUR USER NAME\Application Data\Arduino\
- Open the preferences.txt file in Notepad.
- Find the line upload.using=bootloader and change it to upload.using=parallel
Now you should be able to program and upload your code through Parallel Programmer.


Comments
Post a Comment